
To not miss out on any new articles, consider subscribing.
Introduction
Earlier this year, I was invited to speak on a podcast and the host asked me what I thought about AutoML taking DS and ML jobs. I gave my response but then that sparked something in me, and I decided that I had to give AutoML a try myself. Of course, I had to write an article about it for you and take you along.
In this article, I will be sharing my learnings from my exploration of AutoML. So before we jump right in, let’s begin with some definitions.
What is AutoML?
AutoML is a field where the entire machine learning process is abstracted, either by software, packages, or tools, carrying out the Exploratory Data Analysis (EDA), model building, tuning hyperparameters, and even deploying models with very little to no code input by a human (machine learning engineer or data scientist). It is a growing area in the Artificial Intelligence (AI) space and there are lots of tools built for it; one of which is PyCaret.
What is PyCaret?
PyCaret is an AutoML Python library that allows people to build and deploy machine learning models with little code. Because of its highly modular structure, you can carry out data preprocessing, feature selection, model building, testing, and evaluation, log experiments, tune hyperparameters, and also deploy final models with this package. It is an end-to-end ML tool all within your notebook or Python script.
Code demo
Now that we have an understanding of AutoML and PyCaret, let’s get right into the demo. The link to this Colab notebook is linked at the end of the article, as well as the Pycaret official documentation page, and other helpful resources.
We’ll begin by installing and importing the relevant libraries. If any of these module imports fail, due to ImportError, you can run pip install.
!pip install pycaret==3.0.0.rc4
!pip install catboost
!pip install xgboost==1.1.0
!pip uninstall -y matplotlib
!pip install -U matplotlib==3.1.3
!pip install evidently
!pip install mlflow
import pandas as pd
import numpy as np
import pycaret
import matplotlib
from pycaret.datasets import get_data
from pycaret.classification import *
from pycaret.utils.generic import check_metric, enable_colab
enable_colab()- Data wrangling
The pycaret.datasets module has a get_data function that can be used to pull the sample datasets in the PyCaret package. You can get a list of datasets available via
all_datasets = get_data('index')This returns a table of all the sample datasets with some metadata such as the type of ML problem to be solved with the dataset, number of records, number of fields, number of missing values, etc.
For this demo, I will be using the employee dataset from PyCaret. It is a classification dataset with multivariate datatypes, 14,999 records, no missing values, 10 fields, and one target variable which is the left field. This data set can be used to train a classification model that predicts employees that will leave a company based on various variables, such as satisfaction level, score of last evaluation, monthly hours, time spent at the company, number of projects done, work accidents, number of promotions, department, and salary level.
employee = get_data('employee')
employee.shape
employee['left'].value_counts()
The first step is to split the dataset into the train data set, which you will use in training the model, and the test data set, which will be unseen by the model but will be used afterward to test the model.
train_data = employee.sample(frac=0.95, random_state=42)
test_data = employee.drop(train_data.index)
train_data.reset_index(inplace=True, drop=True)
test_data.reset_index(inplace=True, drop=True)
print('Train Data for Modeling: ' + str(train_data.shape))
print('Test Data For Predictions: ' + str(test_data.shape))- Initialize the model
Then, I will initialize my classifier.
clf = setup(data = train_data, target = 'left', session_id = 1, log_experiment = True, experiment_name = 'article_code1') The first argument passed to the setup method is the training dataset used to build the classifier mode. The next argument is the variable name of the target in the dataset and session_id is the argument for reproducibility. If you decide to run this model as an experiment, you set the log_experiment parameter to True and give an experiment_name.
After initializing the classifier, you can run some functions to get the best models.
- To see a list of all the models available in the PyCaret package
models()- These are a lot of models and you might be confused about which to use. To solve this, you can use the
compare_modelsmethod. This returns a table with different models and performance metrics like accuracy, precision, recall, AUC, etc., for each of the models.
models_compared = compare_models()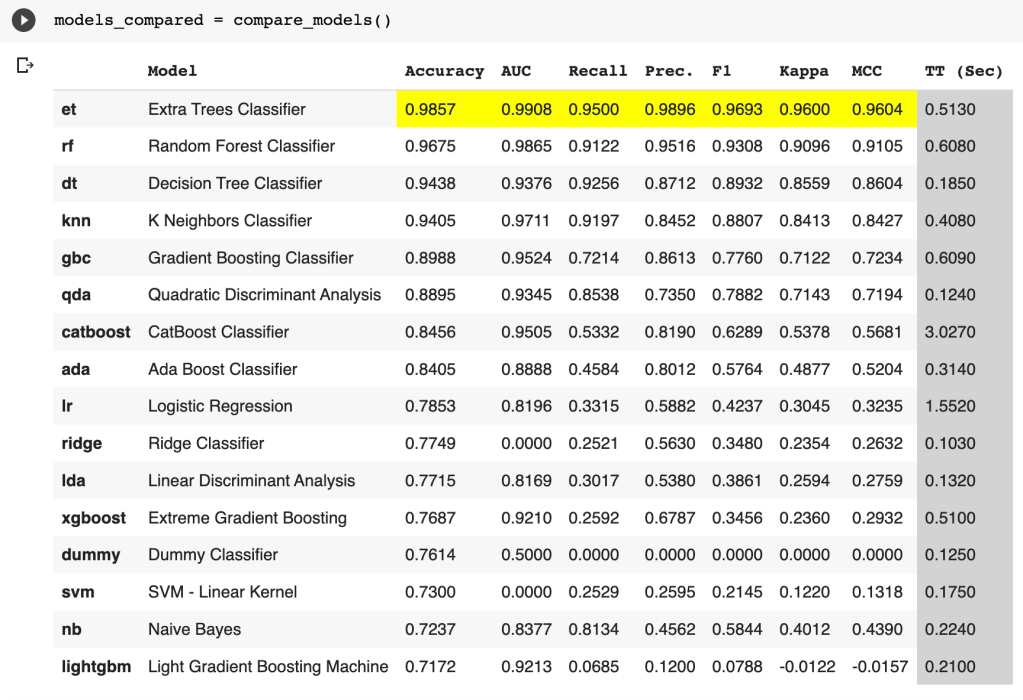
From this, we can see that the extra trees classifier model has the best performance.
To see more in-depth attributes of this model,
print(models_compared)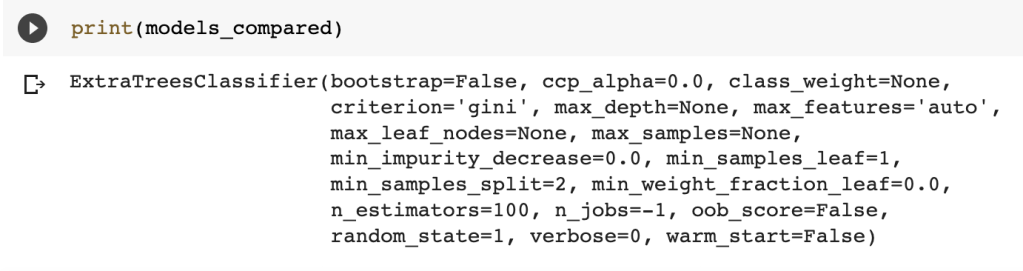
I also tried out the extra trees, decision trees, KNN models, and tuned each of them to compare their performances. This can be found in the full notebook. After experimenting with these, I decided to go forward with the random forest model.
- Model building
Now, we can go ahead to build the model to use. The create_model function takes in the name of the algorithm, in this case, rf for random forest trees which is the one I decided to go with.
rf_model = create_model('rf')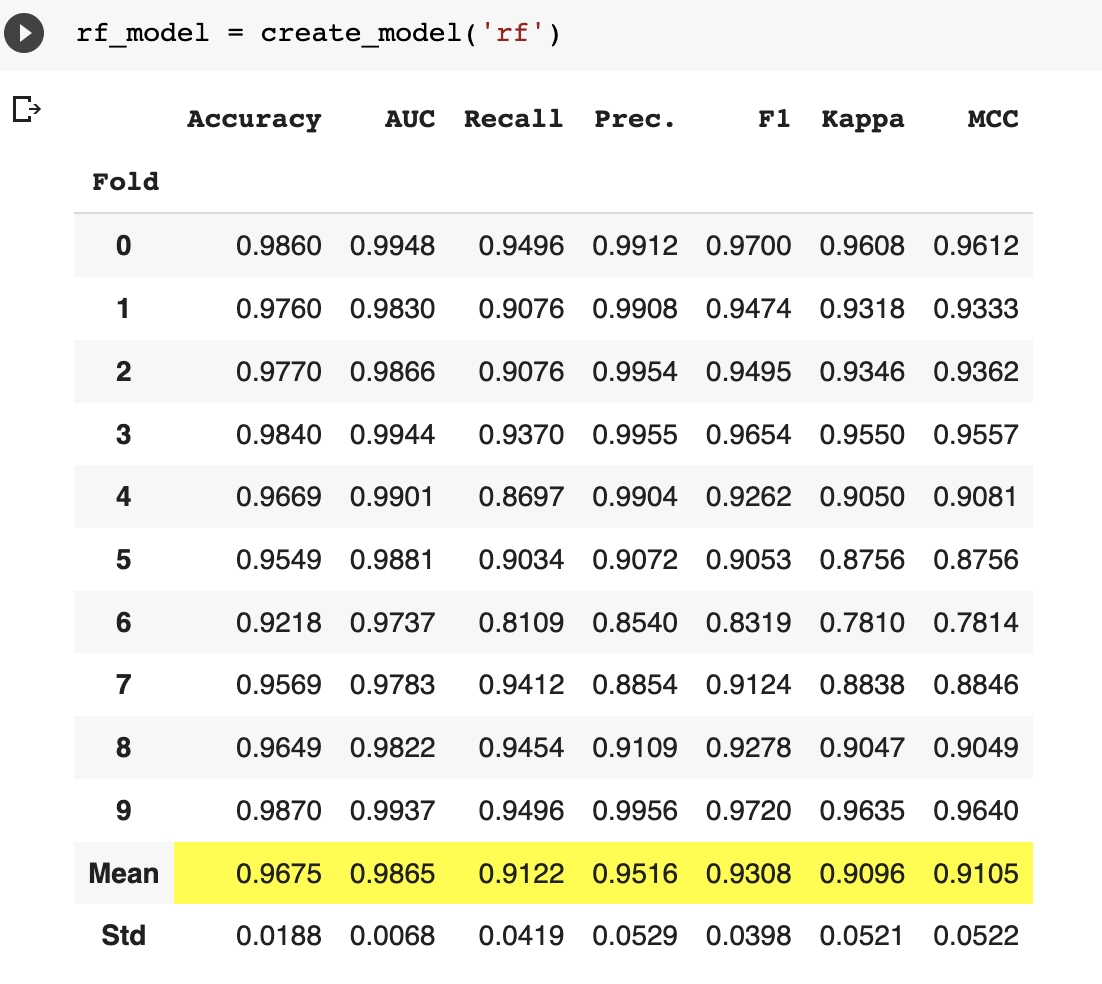
You can further tune the model based on the performance metric that you are most interested in. In this case, our dataset is slightly imbalanced so accuracy is not the best metric. Recall is a more appropriate performance metric for this use case because we care about minimizing false negatives. i.e, we want to capture as many employees that actually left as possible.
tuned_rf_model = tune_model(rf_model, optimize = 'Recall')
- Test the model
To test the performance of the model, we run the predict_model function to get the major performance metrics for a classification ML problem. These are accuracy, recall, F1, precision, Area Under Curve (AUC), Kappa, and Matthews Correlation Coefficient (MCC).
predict_model(tuned_rf_model, drift_report = True)
When the drift_report parameter is set to True, Pycaret uses Evidently AI for model monitoring. It generates an interactive drift report to show data drift and model anomaly.
- Model evaluation
Now that we have built and tested the model, you want to evaluate its performance. Apart from the metric table that is produced after creating or tuning the model, you can also make plots for different metrics.
plot_model(tuned_rf_model, plot = 'auc')
In this case, I’m plotting the Area-Under-Curve (AUC) of the tuned random forest model.
The next instructions plot the precision-recall curve, feature importance, and confusion matrix of the model.
plot_model(tuned_rf_model, plot = 'pr')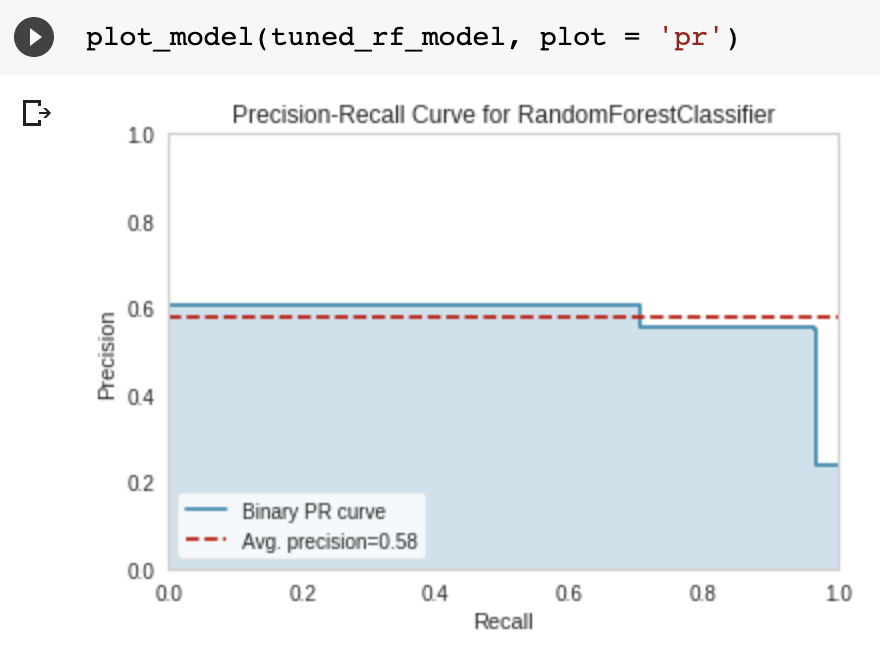
plot_model(tuned_rf_model, plot = 'feature')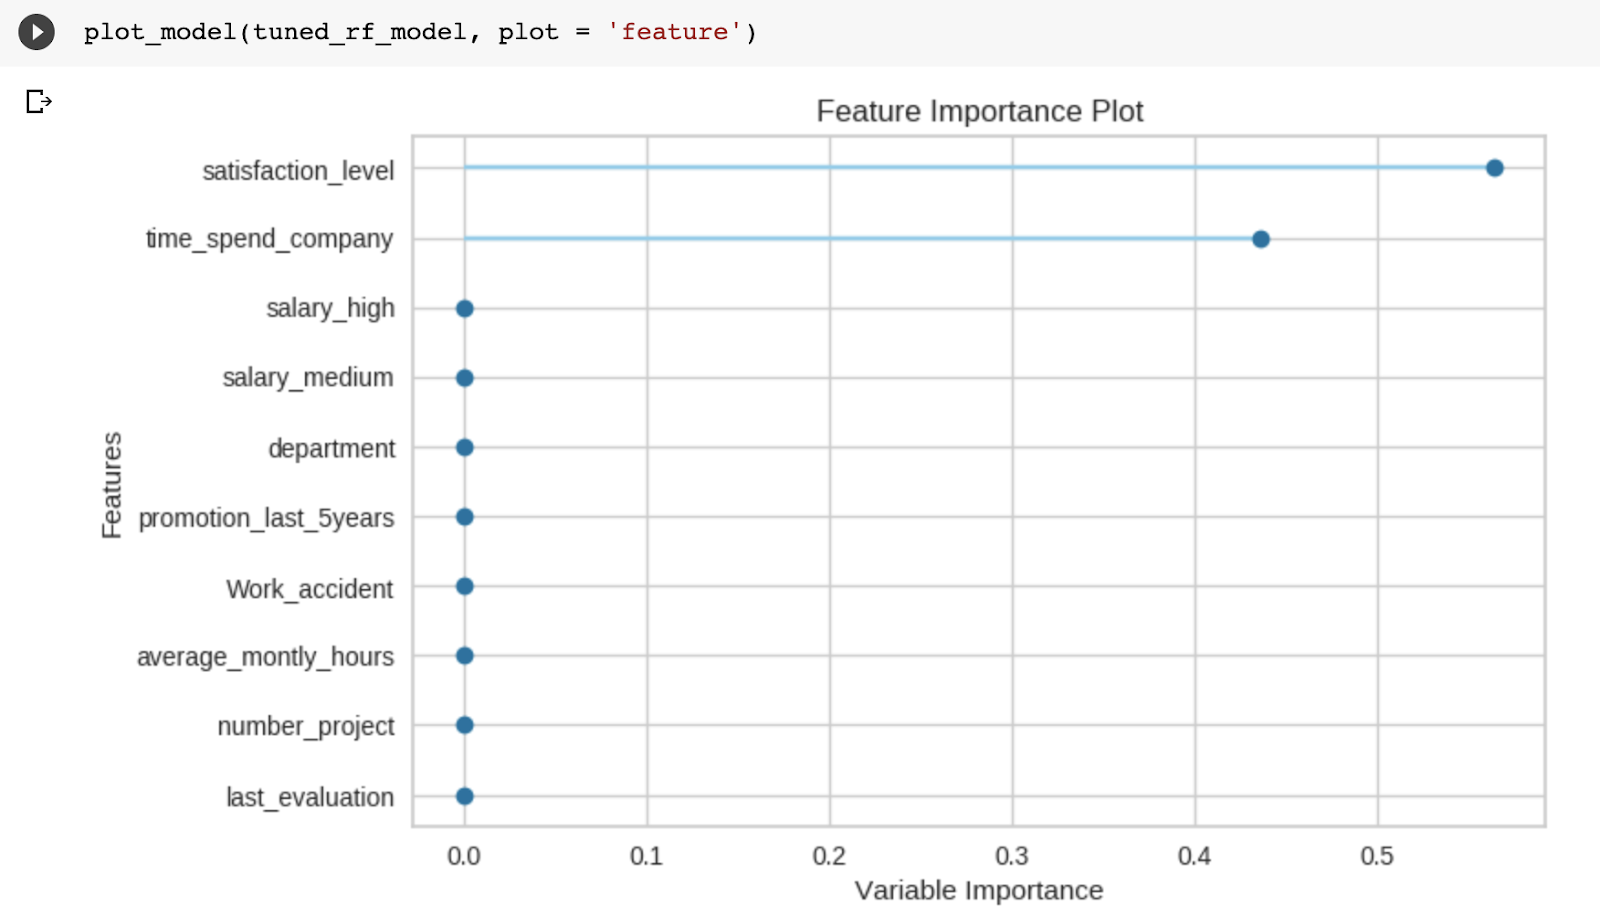
plot_model(tuned_rf_model, plot = 'confusion_matrix')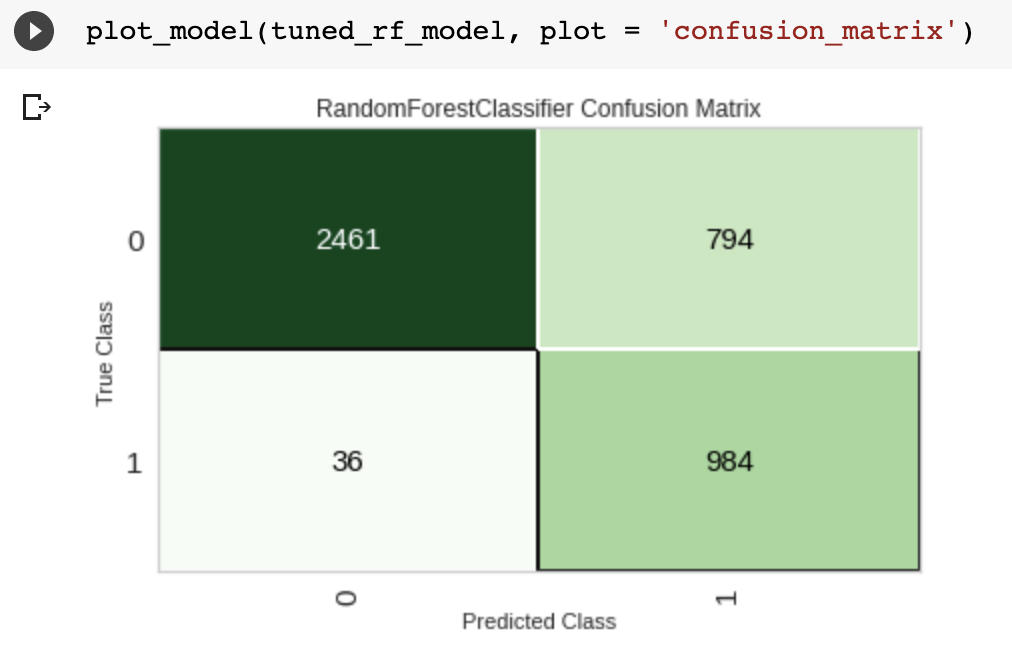
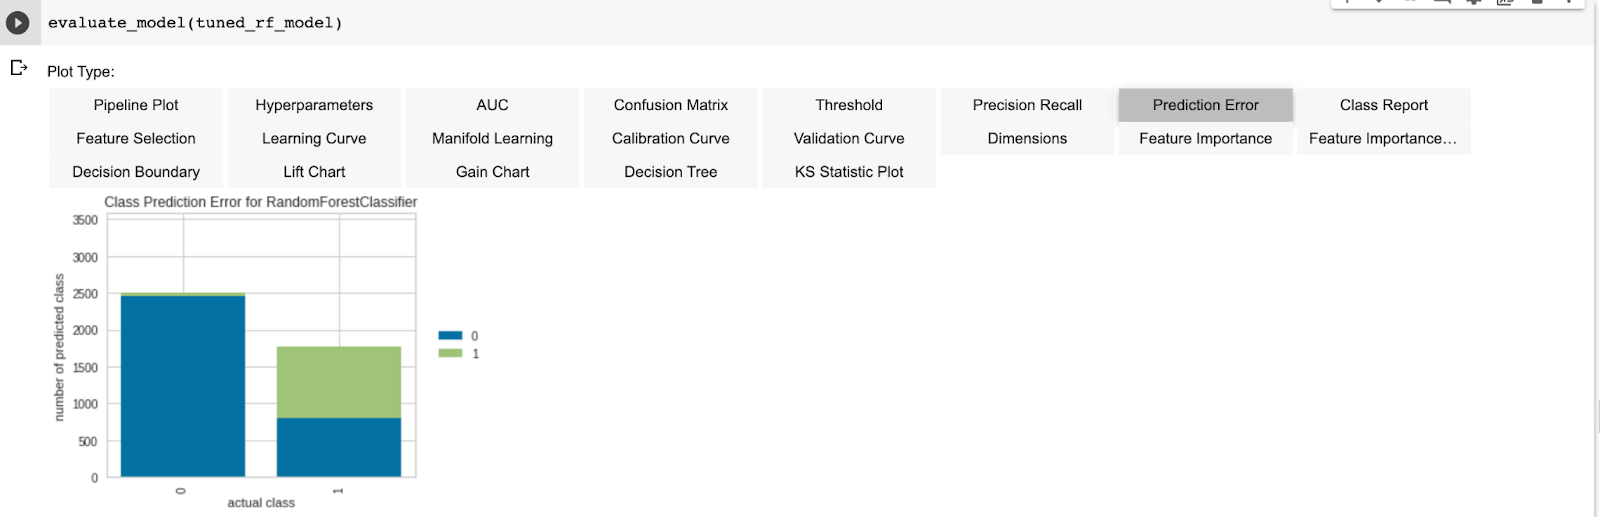
A more in-depth evaluation of the model can also be done with
evaluate_model(tuned_rf_model)This returns individual tabs for multiple metrics to be measured in values and figures. Some of these tabs are AUC, Confusion matrix, Prediction error, Classification report, Learning curve, etc.
You can carry out more hyperparameter tuning as you desire and when you are pleased with the performance of your model, you can then go ahead to finalize and save the model
- Finalize the model
When you are satisfied with the performance of your model on the training dataset, you finalize your model and save it for possible reuse or future use.
final_rf = finalize_model(tuned_rf_model)Also, make sure to test your finalized model on unseen data (data that the model was not trained on and has not seen before) to confirm its performance before saving.
unseen_predictions = predict_model(final_rf, data=test_data)
unseen_predictions.head()
- Save the model for reuse
Then you can go ahead to save the model you have trained and tested using save_model function, and passing in your finalized model name and a name for the saved model file.
save_model(final_rf, 'Final RF Model 18Nov2022')
To get back this model for reuse in the future, you load the model with the name you saved it as
saved_final_rf = load_model('Final RF Model 18Nov2022')At this point, you have successfully trained an AutoML random forest classifier model to predict which employees will leave an organization or not. You can view the full code used in this article in the Colab notebook and on GitHub.
Conclusion
We have covered the definitions of AutoML, and PyCaret–the Python library, and worked through a code demo to build an AutoML random forest classifier model. I hope this article has been helpful in giving you a jumpstart. You can also listen to the Datadition podcast episode, that inspired this article, on Apple Podcasts and Spotify.
Please feel free to drop a comment below or send an email to me: contactaniekan at gmail dot com if you have any questions, comments, feedback, or suggestions for future articles. I look forward to reading from you. I’ll appreciate it if you share this piece as well.
Thank you for reading.
Aniekan.
Additional resources
- https://pycaret.readthedocs.io/en/stable/api/classification.html
- https://pycaret.gitbook.io/docs/get-started/quickstart
- https://www.automl.org/automl/
To not miss out on any new articles, consider subscribing.
