
To not miss out on any new articles, consider subscribing.
In my previous article, I gave an introduction to robot programming and an overview of ROS, the middleware used for robot programming.
In this article, I will be focusing on a Python implementation and will be sharing a sample robot programming script. These scripts are stored in groups, called packages, with each package having a major goal. You can either build your packages with catkin or rosbuild build systems.
What is a build system?
A build system is a program that takes in source code as input and outputs software that the end-user can use. These outputs could either be executables, libraries, or interfaces, etc. In our case, the build system outputs executables that drive the robot. Catkin is the official build system for ROS, replacing rosbuild. Catkin combines CMake Macros and Python scripts to build inter-dependent but separately developed projects.
Each ROS package is located in its folder and all packages are in a catkin workspace. Therefore, the first step is to create a Catkin workspace
Steps for creating a Catkin workspace
1. Install catkin
Most ROS distributions include catkin by default when installing. Installing ROS is dependent on what distribution you want and your computer operating system. I will be using ROS version 1 for this article and it only works on Unix-based platforms. If you have questions about installing ROS, you can read the documentation here. However, if it is not installed, you can manually install it and its dependencies by running the following commands in your terminal:
$ sudo apt-get install ros-<distribution_name>-catkin
(where <distribution_name> is replaced by either melodic, noetic, kinetic or whatever ROS distribution you are using.) And then:
$ sudo apt-get install cmake python-catkin-pkg python-empy python-nose python-setuptools libgtest-dev build-essential
2. Create a folder for catkin workspace (after installing your desired ros distribution, catkin, and sourcing)
The next step is to source your environment so that your system can locate ROS. This is done by entering the command below in your terminal:
$ source /opt/ros/<distribution_name>/setup.bash
(where <distribution_name> is replaced by either melodic, noetic, kinetic, or whatever ROS distribution you are using.)
After sourcing, you create a folder for your catkin workspace and build.
$ mkdir -p ~/catkin_ws/src
This creates a new folder in your home directory called catkin_ws, which stands for catkin workspace, and creates a subfolder, src, which is the source folder for the source code (packages).
Change the current directory to the catkin workspace
$ cd ~/catkin_ws/
And build the workspace with the command below. Building the workspace for the first time creates a CMakeLists.txt link in the src folder.
$ catkin_make
To enable your system to locate the catkin_ws as the catkin workspace folder so you can run packages from anywhere in the terminal, you have to source your setup file.
In catkin_ws, there is a devel folder that holds many setup .*sh scripts. To source your new setup bash file, run
$ source devel/setup.bash
To avoid doing this in every new terminal you open before trying to run a ROS package, you can add this to a bash script by following the next steps:
$ gedit ~/.bashrc
This will open a file in which you should scroll to the bottom and add this after your last line.
source ~/catkin_ws/devel/setup.bash
Save the file and exit. This is assuming that your workspace is in your home directory. If it isn’t, you replace ~ with the absolute to your catkin workspace.
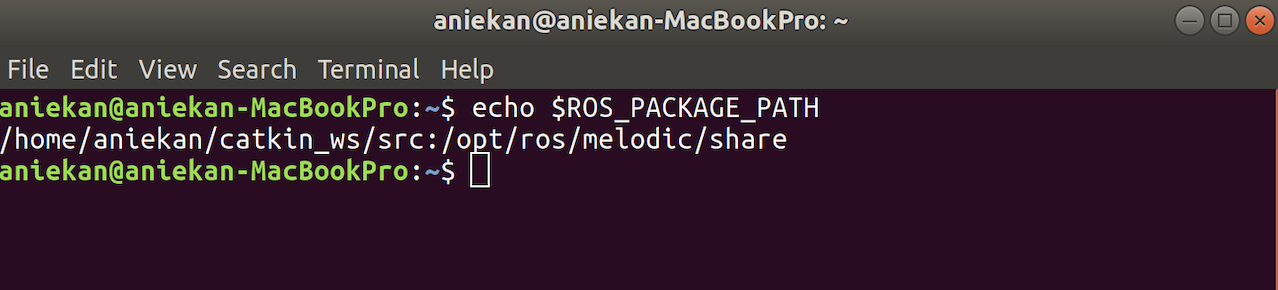
If you would like to confirm that the catkin workspace has been created and sourced successfully, running the following terminal should output the current folder. This means the catkin workspace folder has been added to the ROS_PACKAGE_PATH environment variable.
$ echo $ROS_PACKAGE_PATH
3. Create a catkin package
From the previous steps, you have successfully created your catkin workspace, and now moving on to create your first package, you change the directory to the src folder in your catkin_ws directory
$ cd ~/catkin_ws/src
To create the package, you give it a package name and list the dependencies the package will need. It is advisable to list the major dependencies, like rospy or roscpp (Python and C++ ROS libraries), a library for receiving messages etc. I will create a package called move_robot with rospy, std_msgs as the dependencies.
$ catkin_create_pkg move_robot rospy std_msgs
The dependencies listed will be automatically stored in a package.xml and CMakeLists.txt files which the catkin_create_pkg command creates.
I listed std_msgs as a dependency because the package will use standard message data types e.g float, int, string, etc. rospy states that the package will make use of python code for the nodes.
The package.xml file contains properties and meta-information about a package in the form of tags. Some of the information generated here is the name of the package, version, description, maintainer, license, and dependencies.
CMakeLists.txt is the file with input information to CMake about how to build the ROS package.
4. Build
After creating a new package, you need to build your catkin workspace again.
$ cd ~/catkin_ws
$ catkin_make
This is a process you have to keep repeating when you update packages.
5. Create a node in the src folder of the package
The node executable file is located in the src folder of the package. So, in the src directory of the package I just created, I will create a new python file called move_robot.py. The name of the file does not have to be the same as the package name, but I love to keep them similar so it is clear to anyone looking at the package what the package and each node are about.

Adding a shebang line as the first line of your python file specifies the python interpreter to be used, and treats your file as a script that is run by the specified interpreter and directly executable from the Unix command line. #!/usr/bin/env python3 is used for Python 3, while #!/usr/bin/env python is for Python 2 which we are using in this case.
You have to set the python file to be executable. I do this by running the following code in the terminal for every new python file in the package.
$ chmod u+x ~/catkin_ws/src/<package_name>/src/<file_name>.py
Replacing the <package_name> and <file_name> with the name of your package and the python file name respectively.
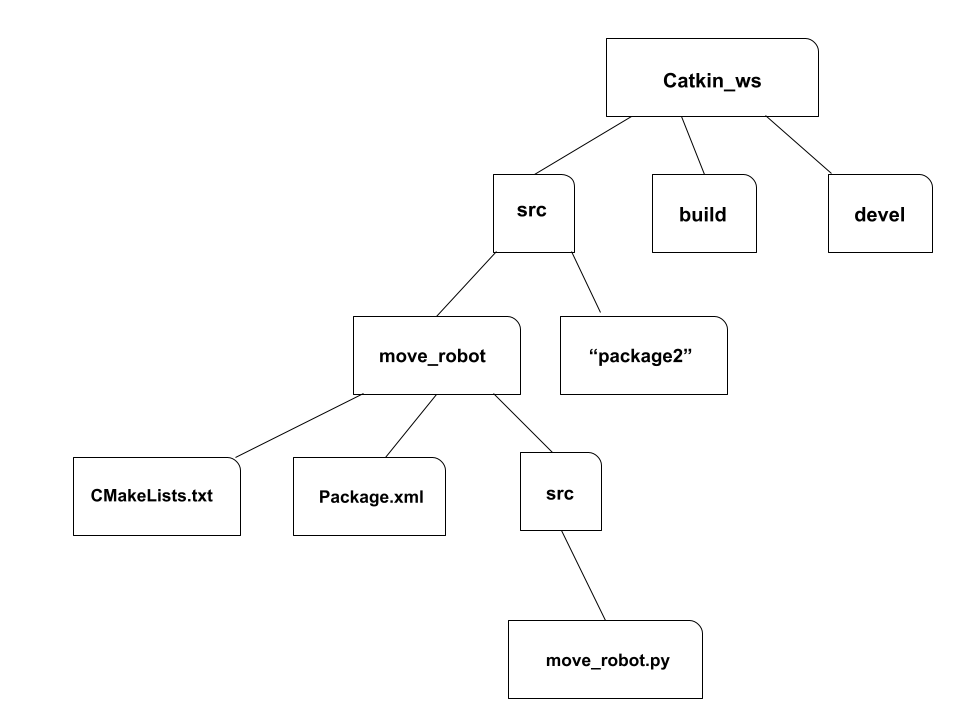
Here is what our current catkin workspace should look like now:
Now to test the node we just created, we first start ROS master with the following command
$ roscore
roscore is a collection of nodes that are pre-requisites of any ROS-based system, and you must run the command before running any nodes in order for nodes to communicate. If you run a launch file with roslaunch, it automatically starts up roscore if roscore is not already running on the system. roscore starts up a ROS master, ROS parameter server, and a rosout logging mode for displaying to the terminal. When roscore is run, it displays parameters like the ROS distribution, version, and IP address.

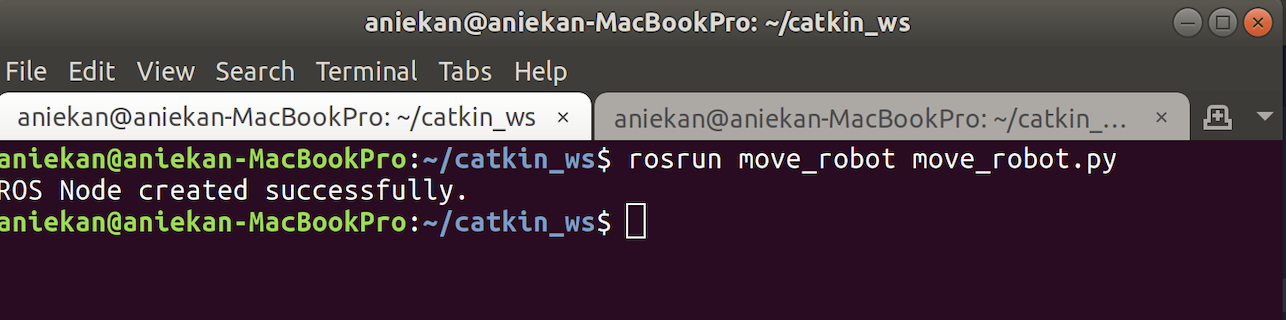
To run the node we just created,
$ rosrun move_robot move_robot.py
The syntax for this is rosrun package_name file_name with the .py extension.
Conclusion
In this article, I covered creating your first package and executable for operating a robot using rospy, the ROS Python client library. This is the second article in my series about programming robots. The next article will cover setting up a robotics simulation environment and adding commands to your created node to give instructions to the robot.
I hope this article and the series, in general, are helpful to you. Thank you for reading.
Aniekan.
To not miss out on any new articles, consider subscribing.
